If you have never ventured into the world of digital painting before, prepare yourself now to start. You will sail with us through this article to learn about the basic and important concepts that will give you a strong push to start in the world of digital painting through the Krita application. Krita is an open-source application used for professional digital painting and digital image processing. It is characterized by great and strong support and is considered an alternative to many graphics applications, including Photoshop. This article can be considered a guide to the most important functions and tools offered by the Krita application.
Vector and Raster Graphics
Krita is primarily used for raster graphics but can also be used to edit vector graphics. I think you might have a question mark on your face asking what the two types of graphics are if you’re new to graphics, so let’s explain these two concepts.
A digital image is made up of a grid of dots (sometimes called pixels). A dot is the smallest element in an image and has a specific color. Raster graphics applications manipulate and modify these pixels. For example, if you have a painting and you choose a one-dot black brush and paint over a white area, you are changing the color of the dots below the brush to white. I think you notice when you zoom in on an image that there are little squares that appear, and each one of them has a color. Those are the dots.
Unlike raster graphics, Vector graphics do not rely on points but on mathematical expressions (equations). When you draw a rectangle on a radial layer in Krita, for example, you are drawing a path through a set of points called nodes, which are part of an (x,y) coordinate axis. When you zoom in or move the image, the computer recalculates those equations, redraws the path (image), and displays it to you. You can then zoom in infinitely without losing resolution. Krita considers all layers to be raster layers except for the radial layer.
Image, Preview, and Window Concept
There are three main types of workspace when using a drawing application:
Image
This is the most important and is created when you open an image or create a new one. Krita allows you to create a new copy when you open an image from the “File” menu or save it as a new file. When you save the image, it contains layers, colors, size, and metadata such as the name of the image owner, date, and resolution DPI (number of dots per inch). You can open multiple images at once and switch between them via the “Window” menu. You can also save the file on your hard disk when you open it in several ways, which are:
-
New: Create a new image. When you press the “Save” button, the application will create a new file and save it to the hard disk.
-
Open: Create a new copy within the program of the file that was opened, and when you press the “Save” button, the application will apply the modifications to the original file.
-
Open existing image as new: Similar to the previous option, but when you press the “Save” button, you will be asked to specify a location to save the file without modifying the original file.
-
Create a copy from the current image: This option is similar to the previous one, but it uses the images you selected previously.
-
Save incrementally: This option creates a new copy of the file every time you modify it, and each copy has a new number. It helps you save old copies of the file.
The above options provide quick navigation between files and taking backups, and there is also an option to auto-save and restore damaged files.
Preview
By view, we mean a window that shows the current image. Krita allows you to view images in multiple views that allow you to manipulate them by zooming in, out, rotating, flipping the image, changing colors, etc. without modifying the image itself. This view is very useful, especially for artists, as it allows them to analyze errors. You can press the “M” button to align two previews of the image.

You can use the multi-view option via the Window → New View → Image Name option, and you can navigate between them from the Window menu or via the shortcut Ctrl + Tab. You can also put all the previews of the image in one place by activating the Subwindow option from the settings via the Window → Tile options.
Docker Control Panel
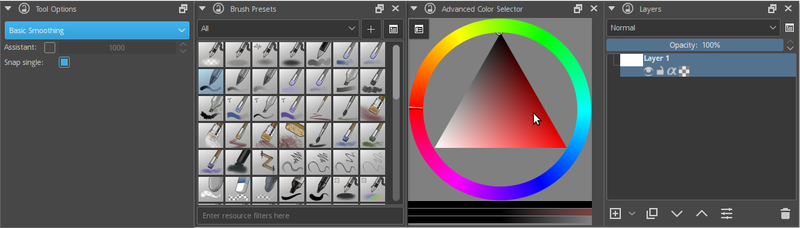
The Dockers dashboard is a sub-window located in the Krita application interface, and contains various tools such as choosing colors, layers, and tools for other options as shown in the image.
All Dockers previews and subwindows are in one window.
The window
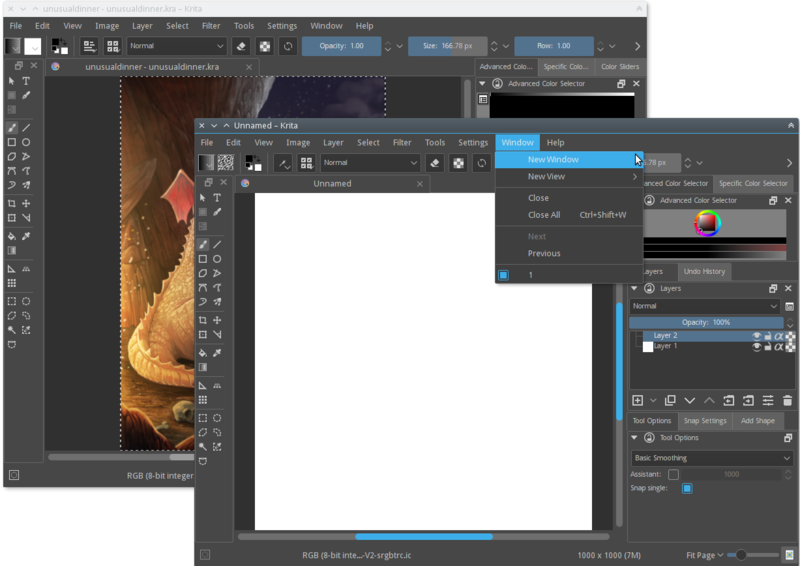
The term Window should be familiar to you, especially if you are a Windows user. Krita provides the ability to open multiple windows from the Window → New window option, which is useful when there are multiple displays connected to the computer. The following image shows an example of multiple windows.
drawing board
When you open a new file from the File menu, you will notice a white rectangular area called the Canvas, as shown in the following image.
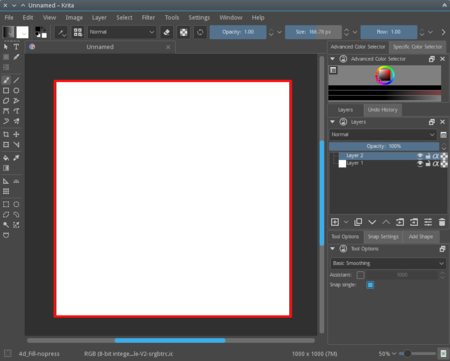
If you want to save the image in “jpg” or “png” format, etc., or print it, the contents that appear are those inside the canvas, and no content will appear outside its borders, but it remains saved within the file in the layers.
Layers
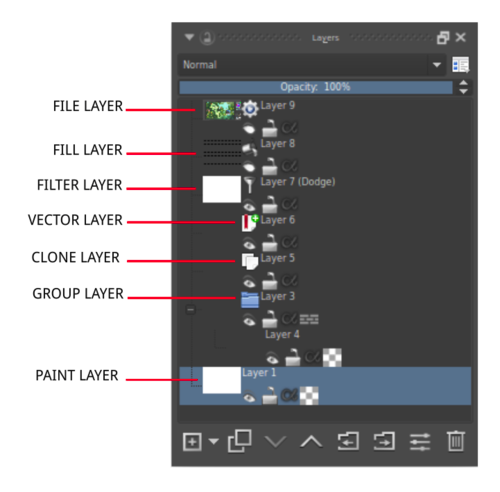
If an artist wants to draw a painting, he starts by drawing the sky, then the distant elements located in the background, the closest ones, taking into account the order until he reaches the foreground elements. We find this clearly when moving to digital drawing while drawing a square and then a circle, where the circle is placed above the square and appears first, and the previous feature is called “arranging the elements of the painting”. Layers help separate the elements of the painting into groups control their order and placement within the painting and modify each one of them without affecting the others. Using layers, you can draw a group of trees with a plateau or mountain behind them. The Krita application contains different types of multi-functional layers, which are:
-
Paint layers: This layer is also known as a raster layer and is the most commonly used type of layer.
-
Vector layers: This type is used with vector graphics.
-
Group layers: With these layers, you can create a group of other layers by dragging and dropping them into a group layer.
-
Clone layers: If you select a layer and then choose to create a new layer of this type, a layer is created that is identical to the selected layer. This type of layer cannot be modified, but it is modified automatically when drawing on the original layer.
-
File layers: These layers are associated with external images and are automatically modified when those original images are modified. They are used for logos and images that change frequently.
-
Fill layers: These layers are filled with specific colors or shapes.
-
Filter layers: These are used to add effects to a group of layers and we will discuss them later.
Layer content can be manipulated via tools.
Tools
Tools are used to edit and manipulate images, and the most popular one is the paintbrush, which is the default tool when you open the Krita application. There are five types of tools, which are:
-
Paint Tools: Used to draw on drawing layers, and can be used to draw rectangles, circles, lines, etc. You can also modify the types of brushes (Brush Engines) used for drawing and add effects to them.
-
Vector Tools: Located in the top row, they are used for vector drawing and editing. You can use all the tools to draw on vector layers except for the freehand brush. You also cannot use the brush tools to add effects to the drawn shapes.
-
Selection Tools: Allows you to select and edit specific areas of a layer without affecting the rest. It works similarly to Masking fluids in regular drawing, which are used to select and edit an area without affecting the surrounding areas.
-
Guide Tools: Includes a set of tools including showing or hiding grid lines and drawing aids.
-
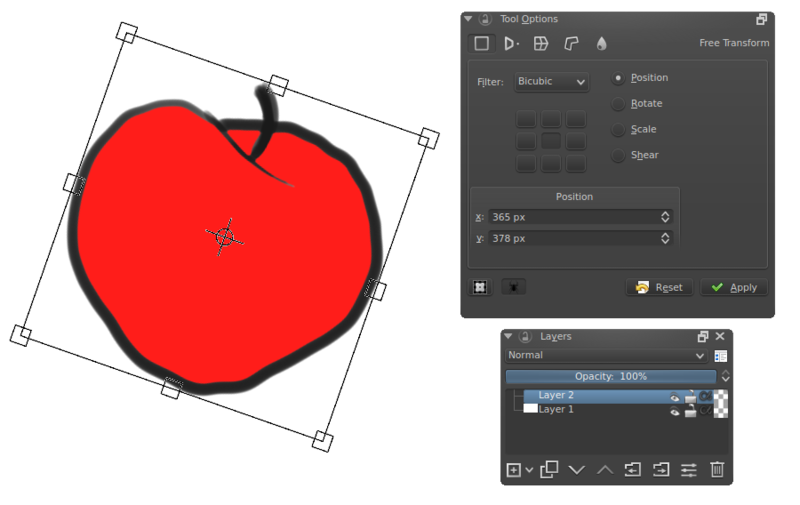
Transform Tools: Allows you to quickly modify selected elements or layers such as resizing, rotating, skewing, etc.
I will leave it to you to discover all the tools and use them in your painting.
Types of brushes
You can create brush patterns or add effects to them, such as creating brush strokes. Krita has many types of brushes with different effects. The image shows three different types of brushes: Pixel brush on the left, Color smudge brush in the middle, and Sketch brush on the right.
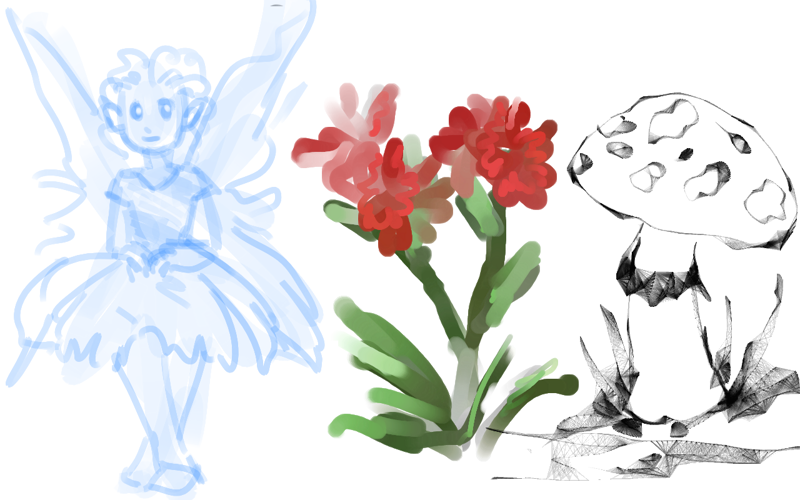
The Pixel brush is very simple and helps you do basic work. If you are fond of drawing, the Color smudge brush is the best. You may notice that it is slow compared to the previous type, but it is characterized by the ability to blend colors. The last type, the Sketch brush, is completely different from the previous ones. It draws scattered and random lines. There are many options for each type of brush, each of which gives a specific effect. You can adjust these effects from the brush settings by pressing the F5 shortcut. The modifications you make to the brush are saved in the previously existing brushes list, which you can access via the F6 shortcut.
The brush paints with colors but how does the computer understand colors?
colors
Humans can see millions of colors which are electromagnetic waves reflected on the surface of an object, either dispersing them or absorbing some of them to be reflected to our eyes and we can distinguish the color of that object. The image below shows two color systems, the right is the RGB system and the left is the CMY system.
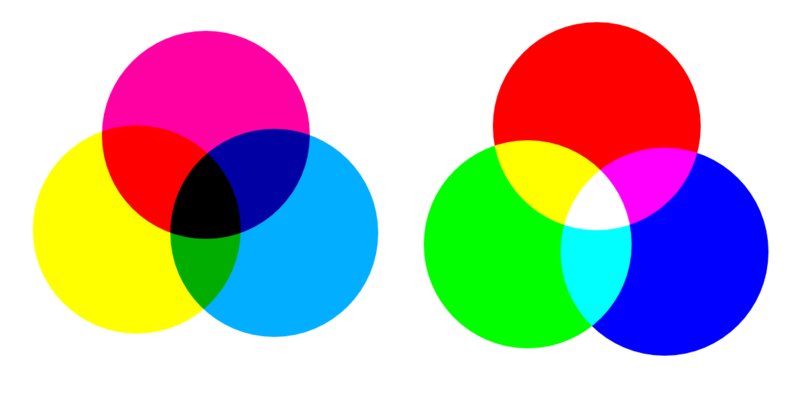
The colors used when painting on a traditional board are pigments that absorb the light waves corresponding to the color we want to obtain. The higher the percentage of pigment, the higher the percentage of light absorption, and thus we get a darker color, and vice versa. The primary colors that are mixed to obtain the rest of the other colors are cyan blue, magenta red, and yellow. As for the white color, it is present on the printing paper, and therefore this CMY system is used for printing.
The computer also uses three primary colors and mixes them in varying amounts to obtain other colors in a similar way to the previous method. Since the computer screen is a light-emitting body, when mixing a large amount of the previous light colors, we get extra light and thus a light color until we reach white. The primary colors are red, green, and blue. Since the computer screen consists of some points, each point glows with different shades of those primary colors to obtain the specified color. Their values range from 0 to 255. The hexadecimal system is usually used, so the computer uses the RGB system. It can also convert to the CMY system or the LAB system. For more, you can benefit from this article.
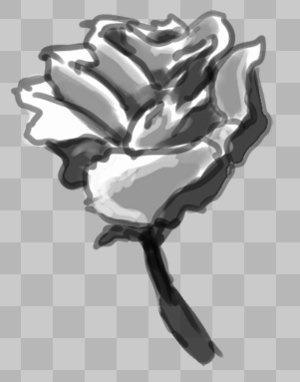
The following image is of a red rose displayed using the red channel, which is similar to grayscale but for the red color. Notice the white color of the leaf, which indicates pure red, and the dark color of the stem, which indicates a lack of red. This is normal because it is green. In other words, the lighter the color, the more red it indicates. The same thing happens when analyzing the image using the green and blue channel modes, if we want to analyze the image into color modes. Krita has a complex color management system that you can learn more about on this page.
Transparency
The computer can tell how transparent each point on the screen is in the same way it can tell the primary colors, so transparency is also a channel called the alpha channel, and transparency becomes important when there are multiple layers.
Blending techniques
Since colors are stored on the computer as numbers, why don’t we perform some mathematical operations on them?! These operations are called Blending modes and can be applied to a layer or a paintbrush. These methods include:
-
Multiply: This method gives opaque colors and thus creates shadows easily.
-
Addition: This method gives light colors, unlike the previous method, which gives distinctive and attractive effects.
-
Erasing: There is no erasing tool in Krita, but rather a blending technique applied to the brush, and when you press the E button, you get something like an eraser.
-
Normal: It is an average blending method between colors based on the transparency of the largest value of the three primary colors.
Krita has 76 blending styles which you can check out here.
Masks
Masks are secondary effects applied to a layer. The main transparency mask is one of them. It uses grayscale to adjust the transparency of the image. Setting black within this mask gives transparency while setting white gives opacity. You can paint over the mask with any brush and you can convert any regular drawing layer into a mask and apply effects to all its elements, whether to show or hide them all. The benefit of the mask comes from applying transparency to things without deleting important pixels from them.
In the following picture, we have a lady in the form of a white ghost but in her form, she does not look like that.
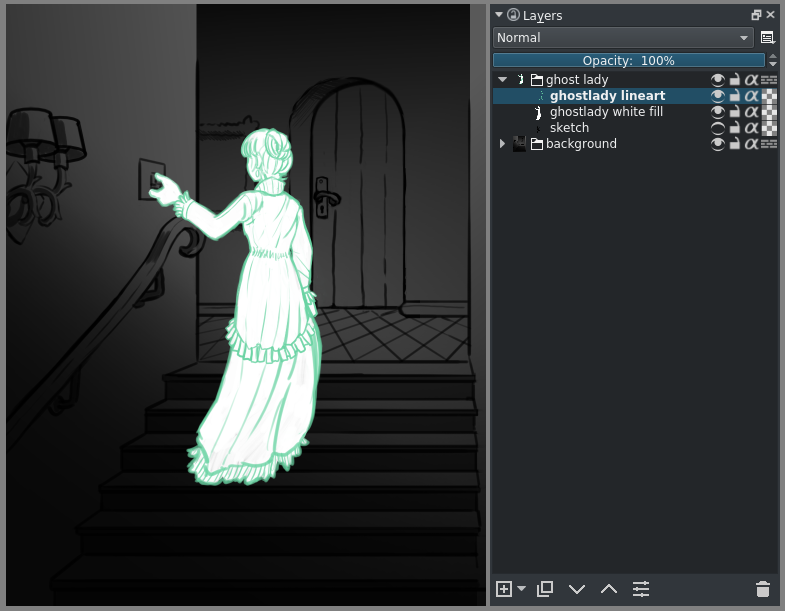
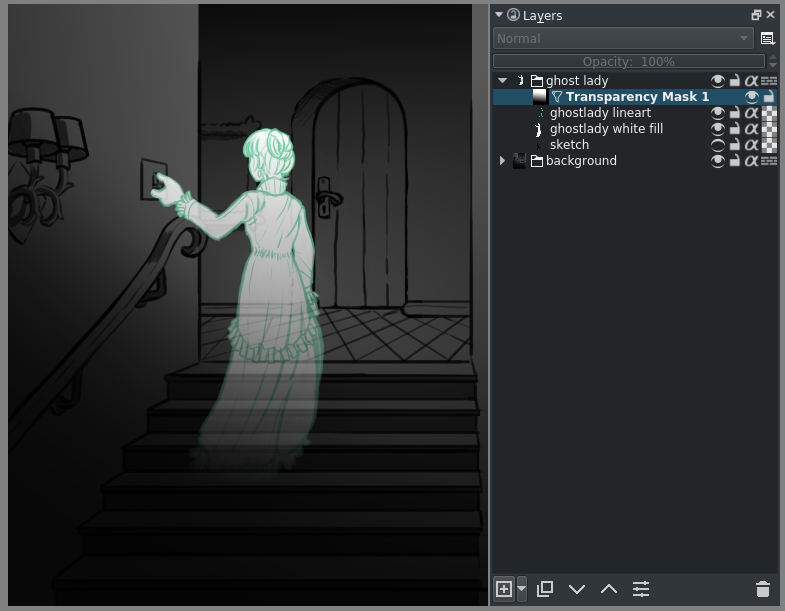
To turn this image into a real ghost, we right-click on the layer and add a Transparency Mask, then adjust the black and white gradients so that the black gradient is at the bottom to obtain greater transparency until we produce the following image, which is closer to the appearance of a real ghost.
Filters
Many mathematical operations can be performed on the points that make up the image, a group of them, or an entire layer. These operations are called “filtering”. In other words, we define filtering as passing an image through a process that processes each of its points. Types of filters include:
-
Desaturate: Convert all image points to grayscale.
-
Blur: The image is smoothed by averaging the points for the selected area or the entire image and produces a hazy or fuzzy appearance.
-
Sharpen: Increases the contrast of adjacent points that have less contrast, making the image clearer.
-
Color to Alpha: A popular filter that turns all selected colors transparent.
The following image shows a different set of filters applied to different parts of an image, and Krita has a large collection of filters.

Using the filter with the brush
Krita offers the ability to use a filter with a brush, while most photo editing apps separate the filter from the brush. With this feature, you can create a brush that blurs the image, increases its contrast, etc.
Layer Filters, Masks, and Layer Styles
Krita allows you to use filters with layers where they become an integral part of the layer and the effects are then applied to all elements of the layer at the same level. Filters can also be used with Filter Masks where their effect is added in place of a mask applied to a group or layer.
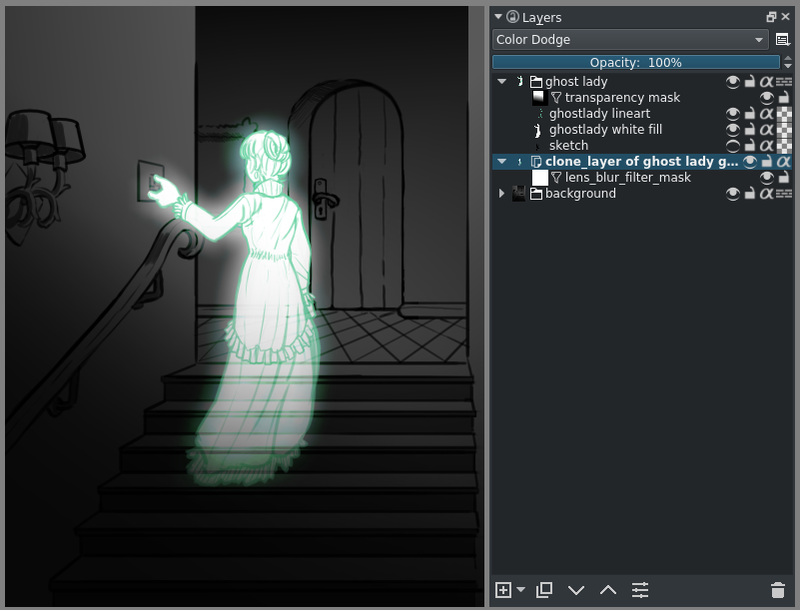
Remember the ghost lady? Let’s tweak her a bit using the filter with the previous mask to give her some glowing light to make her look more realistic. Select the ghost layer and create a new duplicate layer. Right-click on that layer add a Gaussian blur filter to the mask and set the value to 10. Place the duplicate layer behind the original layer and set the blending mode to Color Dodge which gives the ghost a distinct glow. If you make any changes to the ghost layer, the changes will be automatically transferred to the duplicate layer.
Layer Styles are a unique feature in Photoshop that adds effects to the entire layer, such as shadows, glows, etc. They are similar to mask filters and are easier to use than masks, but they are limited. They can be applied to the layer by right-clicking on it and then choosing Layer Styles.
Modifications
These are mathematical operations performed on the image points and are similar to filters. Deformations include resizing, flipping, and rotating the image, the crop tool that affects the size of the canvas, and the move tool. Using these tools, you can rotate or resize the canvas or place it in a certain perspective. You can also use advanced tools such as the wrap tool, the cage tool, and the liquefy tool that creates a set of nodes around the shape to distort it slightly and create new shapes.
Adjustment brush
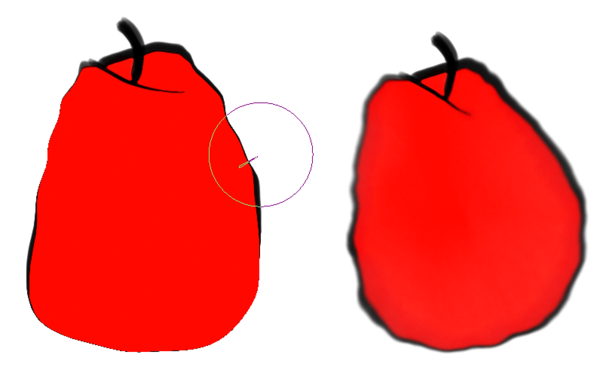
Krita offers a combination of deforming object transformations and brushes to create the Deform brush engine, a faster but less precise version of the Liquefy transform tool. The image below shows the Liquefy transform tool on the left being used to balance out the Deform brush on the right.
Modification Masks
Transforms can become part of the layer like filters and masks as long as they are not distorting the image, and grayscale cannot be used with them, unlike filters and layers due to a technical glitch.
Animation
Krita 3.0 supports raster animation, providing a timeline and tools to preview motion, as well as various brushes for raster animation, with the ability to export as a gift image or video.
Drawing aids
We must not forget that Krita is a digital drawing application and it must contain drawing tools like those we use for drawing in our daily life such as the ruler and other tools that help in drawing. Below we will review some of the tools that the application provides.
Network and auxiliary lines
They are important tools that help a lot in the drawing process, as they can display grids, which are a groups of horizontal and vertical lines with specific spacings, or place auxiliary lines on the drawing board whose function is similar to that of a ruler.
Capture
It is also one of the important tools in drawing, as it can capture many things by simply moving the mouse pointer closer to them, such as the center of the image, grid lines, auxiliary or perpendicular lines, shape borders, etc.
Auxiliary elements
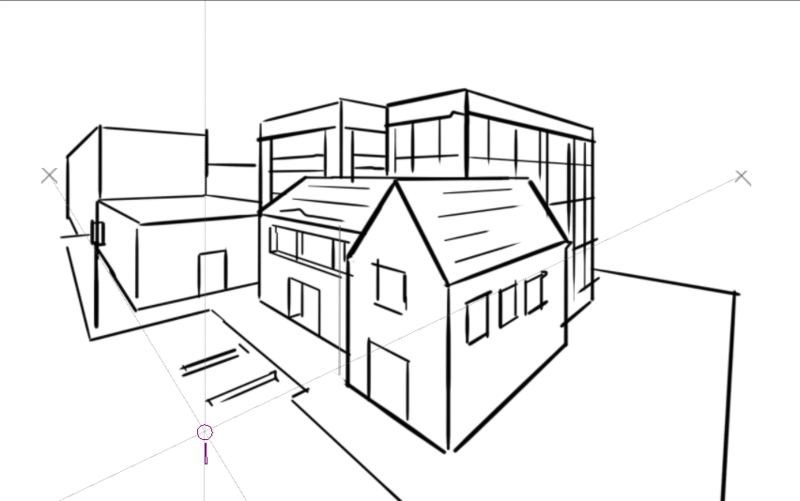
Remember when you placed two or more points on a board to connect them with straight lines or your math teacher asked you to draw two parallel or perpendicular lines or two tangent or concentric circles? Krita’s helpers help you do these tasks and more.
The image above shows the use of some of the utilities, and once you are done with them you can easily remove them.
Customize your workspace
Finally, everyone, especially artists, prefers their own space to work, such as placing the elements bar in a preferred place on the screen or placing their most used shortcuts in the toolbar or other work environment. Krita did not neglect this but provided a set of settings to customize the work environment and save it through a button located at the top right.
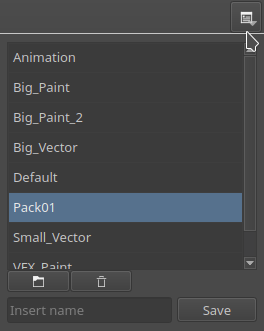
The toolbar can be adjusted from Settings → Configure Toolbars, shortcuts can be adjusted from Settings → Configure Krita → Configure Shortcuts and from Settings → Configure Krita → Canvas Input Settings.